The first step in designing and building a harp is... designing it. This time I'm using the computer. Oh how I love those bezier curves. It's a snap to tweak it here and there until it looks just right. I also like being able to accurately space the strings, then with a click and a drag adjust their angle with the sound box until I like the shape of the harmonic curve along the top. Back when I did this by hand I had to re-draw everything if I wanted to try a different angle.
After I've got the design ready, I can print it out, actual size, on multiple sheets of paper. Then I tape it together and trace the arch and pillar onto my sheet of plywood.
I cleaned up the workshop today and should be ready to start cutting on Monday.
Showing posts with label harp. Show all posts
Sunday, August 4, 2013
Monday, December 31, 2012
Harp Update
![]() |
This is how it all looked at the beginning of the semester. |
This time, I was unexpectedly asked to teach two college classes when I thought I'd be taking a semester off, and this only a short while after I'd cut out all the pieces. I like having money, so I said yes to the teaching and let the harp pieces sit in the garage. When I had the chance on a weekend I'd steal a few hours to make some progress on the project. Forget setting up photos and then coming up with something witty to say about them on my blog.
![]() |
We stained most of the pieces over Thanksgiving weekend. |
![]() | |
Over Christmas break we finished the staining and I fitted the box. |
Labels:
harp
Friday, April 16, 2010
The Soundboard and Box Back

The soundboard is one of the most important, and definitely the most expensive, part of the harp. Every moment, the strings threaten to rip the harp apart with a thousand pounds of tension, and only the soundboard stands in the way. Think about that while you're working!
Here are your templates for cutting both the soundboard and the box back, once again on a one-inch grid. Each piece is a long isosceles trapezoid, 29 inches high with base 11 1/4 and top 2 3/4 inches across. The back of the box is the one with the holes in it.
Cut the soundboard with the grain running across the short direction. For the back of the box it doesn't matter which way the grain is running.
Use a jig saw or a coping saw to cut out the holes in the back of the box, then sand all the edges so that they're smooth. This is where I'm glad I have a Dremel.
Labels:
harp
Friday, March 19, 2010
The Sound Box
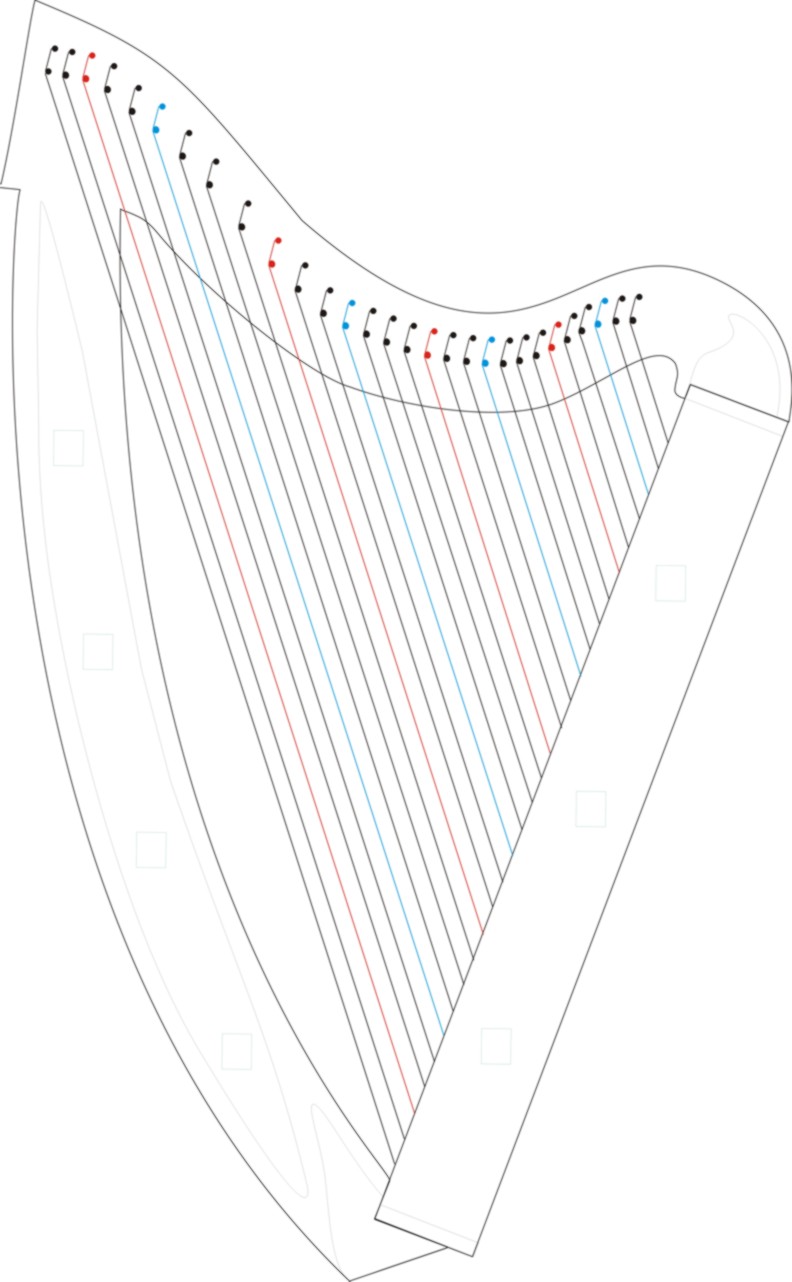
Today we'll cut the sides of the sound box and make the joints. You'll want to use the 1/2 inch blade on your band saw for clean, straight cuts.
To make the sound box, you need two boards, 4 ft by 3 1/2 inch by 1/2 inch. I get mine at Lowes. From one board, mark and cut a piece 29 3/8 inches long and another piece 12 inches long. Then from the other board, cut one piece 29 3/8 inches long and one piece 3 1/2 inches long.
Lay the box out. It helps if you have one of these cutting mats with a grid on it. I like to make a note on the inside of each board which direction is the top, bottom, front, and back of the box. I also draw a line down the middle of the inside of the top piece and the bottom piece of the box.
Next, take a your pencil and sketch the cuts for the joints. The sides are at slightly less than a 90 degree angle from the bottom of the box, and slightly more than 90 degrees from the top, so you'll need to angle the joints accordingly. The joints should be 1/8 inch deep at the deepest part, and a little less than that at the shallow part.
Raise the guide on your band saw so that it's high enough to get the board in there sideways, and very carefully cut the joints. Then reassemble the box and check to see if the joints are good. On this one the angle got too deep, so I took it back to the band saw and cut a little bit more off the outside edge.
Once you have all the joints cut, measure the box from the top to the bottom and make sure it is nearly 29 3/4 inches. If it is longer, you may need to make your joints a little deeper or the arch and pillar piece won't fit. If it is much shorter you may need to go back to Lowe's and get some more boards and try again.
But if you did it just right, you can slide your assembled box into your arch and pillar piece and stand it up like this:
Labels:
harp
Thursday, March 18, 2010
Arch and Pillar
If you're not familiar with harp terminology, the arch of a harp is that curvy part on top where the strings attach to the pins. The pillar is the piece that holds up the arch. In traditional harp making, these are cut as two different pieces and joined. I keep things simple and cut them as one piece out of plywood. Here's the template:
The grid is marked in inches. The green lines are the outline for the arch and pillar piece, while the red lines show where the box will go.
Trace the pattern for the arch and pillar piece onto a 4 ft by 4 ft sheet of 3/4 inch plywood. Lay the pattern out so the pillar runs along the grain. You should have enough room to cut out two. One for now and one for later, or one for yourself and one for a friend:
Rough cut the pieces using a circular saw or a table saw, and then cut them out with a 1/4 inch bandsaw blade. Sand the edges to get off all the bandsaw marks, and then fill any gaps with wood putty.
Next time: The Sound Box
Labels:
harp
Wednesday, March 17, 2010
How to Make Your Own Irish Harp for around $250
In honor of St. Patrick's Day, I'm going to start blogging about my harp-making process. This time, I'll include diagrams, plans, and instructions. In other words, YOU, dear reader, should be able to do it for yourself.
Here is what you'll need:
- Complete hardware kit for the 29 String Studio Harp available at harpkit.com. This includes strings, pins, wood screws, finishing nails, and even a tuning wrench. $74
- A sheet of 1/8 inch, 5 ply aircraft birch laminate, at least 12 inches by 29 inches, cut with the grain running parallel to the short side. This can also be ordered from harpkit.com, but you may be able to find it cheaper somewhere else. Be sure and let them know which way you want the grain. $60
- Another sheet of 1/8 inch plywood, same size, but it doesn't need to be aircraft quality. 3 ply is fine. This will be for the soundbox back. $10
- One 4ft by 4ft piece of 3/4 inch oak plywood. This is for the arch and pillar. Available at Lowes. $35
- Four solid wood boards, 1/2 inch by 3 1/2 inches by 4 feet, also available at Lowes. They call them craft boards, and they come in oak, poplar, and pine. I recommend the oak or poplar. These will become the soundbox and part of the pillar as well. $20 - $40.
- A piece of 1/4 inch by 3/4 inch oak batten, 5 feet long, for the string rib. $5
- Your favorite woodworking tools. I use a circular saw
, a band saw
, and my Dremel
(which has a router
attachment). A table saw and a jig saw would probably work instead, if the jigsaw is big enough handle the 3/4 inch thick oak plywood. You will also need sand paper of various grits, 50 - 200, and paint brushes or soft rags for staining and varnishing. If you don't already have woodworking tools, I'm sorry but your harp is going to be more expensive than I said. But if you don't already have woodworking tools, you probably want to start with a simpler project. Just a suggestion.
- The strongest 30-minute epoxy
you can find. $10
- A small can of wood stain
and a small can of polyurethane. Even if you have these in the garage already, you may want to get fresh, new stuff. Especially when it comes to the polyurethane. $12
Labels:
harp
Thursday, February 25, 2010
At Last!
I finally, finally made a recording I like of my harp tune, "Hedgerows and Fences." I wrote it years ago, when I was new to the harp, and when my harp teacher heard me struggling through it the first time she said, "Why do you write such difficult pieces for yourself? You should start with something easier. It's going to take you forever to learn to play that."
She was right. But here's the sweet success:
http://gnomonkeep.org/harp/hedgerows.mp3
And then my harp teacher laughed at me and said, "But you're going to be famous someday."
That remains to be seen.
She was right. But here's the sweet success:
http://gnomonkeep.org/harp/hedgerows.mp3
And then my harp teacher laughed at me and said, "But you're going to be famous someday."
That remains to be seen.
Labels:
harp
Tuesday, December 8, 2009
Harp Template

I've had several requests by e-mail for plans for my harp. Sadly, I don't have detailed plans drawn up. But I laid out the one drawing I did and put an inch ruler down beside it to show the scale. Here it is - good luck!
Labels:
harp
Wednesday, August 19, 2009
Harping Away
Yesterday afternoon I ordered the materials to build three new harps. I had just come home from playing my 29 string harp at a funeral. Because I had focused so much on my writing this past year I had stopped practicing the harp every day. Four days before the funeral, when I was called and asked to play, I accepted eagerly. Two days later I thought I was going to have blisters on my finger-tips. No amount of catch-up practicing could make up for all those long months that my harp sat in the corner.
Never again. I'm going to practice the harp every day for the rest of my life.
My performance at the funeral went well, and now because of the nice thick callouses I've built up over the last few days I can barely feel the keys under my fingers as I type. After the funeral I got lots of nice comments. It was wonderful to think that an instrument I'd built with my own hands was able to bring peace and comfort to so many people. One of my friends who was there told me she'd always wanted to learn the harp. I had been thinking of building some more harps this fall, so that clinched my decision. Once the three harps are done I will sell them or rent them out to students. There should be more harps in the world!
And this morning, what rolled me out of bed was not some sentence I felt I had to restructure, but a need to know exactly what the angle between the soundboard and the strings should be. Hooray for the internet! The answer: between 30 and 40 degrees, closer to 30 for a modern concert harp.
For more info on how to build a harp, visit my How to Build a Harp page.
Labels:
harp
Monday, June 22, 2009
Amber's Harp Songs
Ten years ago, when I first began to play the harp, I would sit up in my daughter's room at night and practice while she fell asleep.
Now she plays the harp herself, and composes. All her music has a distinctly Celtic feel to it, I imagine because that is the style I was drawn to when I began to play.
Here are three of her original harp tunes:
Dragonflies (short)
Autumn Wind (long)
Days End (longer)
Now she plays the harp herself, and composes. All her music has a distinctly Celtic feel to it, I imagine because that is the style I was drawn to when I began to play.
Here are three of her original harp tunes:
Dragonflies (short)
Autumn Wind (long)
Days End (longer)
Labels:
harp
Sunday, April 26, 2009
Harp Memories
In honor of my recently departed, lovingly crafted 36 string lever harp, here's a link to a couple of audio files I made using it:
The First Nowell
In The Bleak Midwinter
And if you enjoy these you can all thank Pmom for asking if she could hear me play sometime.
The First Nowell
In The Bleak Midwinter
And if you enjoy these you can all thank Pmom for asking if she could hear me play sometime.
Labels:
harp
Wednesday, April 22, 2009
Goodbye Harp
Cracks appeared several months ago in the soundboard of my big lever harp. Last night the cracking got so bad that the harp won't hold tune anymore. I tuned it up one last time and played it for a while, then got startled out of my seat by a loud snap as another section began to splinter.
It lasted five years - not bad for what it was. My friend Heidi James and I designed it on a whim and she spent three years off and on in building it. After I adopted it I continued to work on it, adding levers and reinforcing the pillar. There's nothing I can do about that soundboard, though. The corner of my front room is going to look very empty without a big harp in it.
I am considering buying a new soundboard ($70) and rebuilding it. A new set of strings would be nice too. Or maybe I should wait until I get an advance on my first novel and just buy myself a new one.
Labels:
harp
Friday, September 12, 2008
Eeek!
I sat down with my daughter today and had her play her latest harp ditty so I could transcribe it. She loves to make up songs on the harp, but she doesn't know how to write them down yet. As I sat there I saw it - A BIG CRACK AT THE BOTTOM OF THE SOUNDBOARD!

What does this mean? The soundboard is failing. I hope the harp lasts until Christmas because I'm supposed to play in church. We can't replace it.

What does this mean? The soundboard is failing. I hope the harp lasts until Christmas because I'm supposed to play in church. We can't replace it.
Labels:
harp
Saturday, July 5, 2008
Patriotic Pancakes

My husband made pancakes shaped like the United States of America for breakfast on the 4th of July.


I finished the harp case last night, so that marks the end of another major project! And now, for my next trick, I will draft a 120 page post-apocalyptic science fiction novel for 9-12 year old readers in less than two months.
Now that I have a satisfactory plot in mind and some solid character development hammered out, I feel like I could just sit down and write the whole thing. It surprised me to discover that after a certain point in the development process the scenes and dialog simply flowed into my head the way they always do, even though this is a fresh new world with fresh new characters I have never worked with before. I wake up in the morning and have exciting new ideas, just like I did for my other books. On top of that, this time I've had so much fun researching Titan II missile silos, anthrax, and asteroid deflection techniques. Maybe I'll stick to science fiction from now on!
Thursday, June 26, 2008
A Harp is Born

Tuning up a new harp can be nerve wracking. It is the final test, and it usually involves some scary creaking and cracking noises as I slowly apply 500 pounds of pressure. I started by tuning each string an octave low, then a sixth, then a fourth, third, second, and finally up to true pitch. This keeps the tension even along the soundboard. You can see a nice little arch beginning on the string rib. So far everything is holding together.
Click here to listen to the sound of the new harp.
Labels:
harp
Thursday, June 12, 2008
Strings
I won't tune the harp up until I get back from my writer's conference, but I can install the strings. This is always a moment of truth. If I've made an error in my design, it will show up now.
I thread each string down through its hole in the string rib, then knot it underneath. I use a basic slip knot tied so that the loose end is the tiny little short end of the string, the end on which there will be no tension. For the thinner strings I thread a piece of thick string into the knot to keep it from pulling through the sound board.
Then I wind each string around the tuning pin three or four times and slip the long end down through the hole in the pin. I turn the pin a half turn so that the string holds in place, then go on to the next one.

So far so good. The strings look parallel and evenly spaced. I'd like a little more change in angle when the strings go over the bridge pins, but it works.
I thread each string down through its hole in the string rib, then knot it underneath. I use a basic slip knot tied so that the loose end is the tiny little short end of the string, the end on which there will be no tension. For the thinner strings I thread a piece of thick string into the knot to keep it from pulling through the sound board.

Then I wind each string around the tuning pin three or four times and slip the long end down through the hole in the pin. I turn the pin a half turn so that the string holds in place, then go on to the next one.

So far so good. The strings look parallel and evenly spaced. I'd like a little more change in angle when the strings go over the bridge pins, but it works.

Labels:
harp
Tuesday, June 3, 2008
Pins

Each harp string needs a bridge pin to hold it and a tuning pin to stretch it to the right pitch. Thats fifty-eight pins for a twenty-nine string harp.
It takes some experimenting to determine the size of the pilot hole for each kind of pin. The pins need to be really tight to keep the strings in tune, so the size of the pilot hole has to depend on the softness of the wood as well as the diameter of the pin. Happily, technology has improved and bridge pins are now threaded so I can screw them in instead of having to bang them in with the hammer.
I can use the electric drill with a screwdriver bit for the bridge pins, but the tuning pins I have to put in by hand using the tuning wrench. I've got seventeen pins left to go and I already have blisters and sore muscles. At least it is two weeks before I can tune up anyways. Bit by bit, it'll get done.
Labels:
harp
Saturday, May 31, 2008
Polyurethane
In some ways, this is the most difficult part of making a harp. Up until this point, whenever I want to putter around in the garage there would always be something for me to do on the harp. Now I have to wait between coats of polyurethane.
The can of polyurethane says to wait four hours between coats, but that is NEVER enough. Not if you want a mirror smooth surface. My woodworking consultant, Heidi, always waits several days between coats. I've compromised for my own method. I wait 24 hours after the first coat, 72 hours after the second coat, and then three weeks after the third coat before tuning up.

Before each coat I sand the whole harp down with 220 grit sandpaper, then remove all dust and oil using a rag dampened with mineral spirits. Oil from my skin can affect the polyurethane, so it is important that once I start this process I never touch the harp without gloves on.

There are probably as many methods of applying polyurethane as there are woodworkers. This is the one I use: using a one-inch fine bristled paint brush and working one small area at a time, brush the polyurethane on against the grain, then smooth it in with the grain. That way I go over every area twice, ensure a thin coat, and catch any drips that might try to happen.
And there you see the result. Just look at that baby shine!
Once the polyurethane is dry, I can paint a design on the soundboard. First I do a line drawing with my drafting pen and waterproof ink. Then I paint using the same wood stain that I used on the body of the harp.
Wood stain is a difficult medium to work with. If you try to paint over an already painted area, the fresh wood stain dissolves the older wood stain and forces all the pigment to the edges of the wet area. So you paint the dark areas first, then lightly brush in the lighter areas around them, trying hard not to bleed the new paint into the old. Of course I do use this interesting property of wood stain to good effect. I can create light colored veins in leaves by painting on a partially dry dark leaf.

For more info on how to build a harp, visit my How to Build a Harp page.
The can of polyurethane says to wait four hours between coats, but that is NEVER enough. Not if you want a mirror smooth surface. My woodworking consultant, Heidi, always waits several days between coats. I've compromised for my own method. I wait 24 hours after the first coat, 72 hours after the second coat, and then three weeks after the third coat before tuning up.

Before each coat I sand the whole harp down with 220 grit sandpaper, then remove all dust and oil using a rag dampened with mineral spirits. Oil from my skin can affect the polyurethane, so it is important that once I start this process I never touch the harp without gloves on.

There are probably as many methods of applying polyurethane as there are woodworkers. This is the one I use: using a one-inch fine bristled paint brush and working one small area at a time, brush the polyurethane on against the grain, then smooth it in with the grain. That way I go over every area twice, ensure a thin coat, and catch any drips that might try to happen.
And there you see the result. Just look at that baby shine!
Once the polyurethane is dry, I can paint a design on the soundboard. First I do a line drawing with my drafting pen and waterproof ink. Then I paint using the same wood stain that I used on the body of the harp.


For more info on how to build a harp, visit my How to Build a Harp page.
Labels:
harp
Monday, May 26, 2008
Putting It All Together
At last the time had come. All the pieces were shaped, fitted, and stained. The harp was ready to be assembled!

I always put this inscription on the back of the soundboard of my harps.
I had already attached the top and bottom of the box to the arch and pillar using wood screws and wood glue. Next I needed to install the wood screws to hold the box together, two on each corner. Because I was working so close to the edges of the boards it was very important to countersink the screws so the boards would not crack.
This red metal brace is to keep the top of the arch from twisting due to the torque from the strings. I'll cover it with a stained wood piece to make it look nice once everything else is assembled.
Once the wood screws are all in place I take them out on one side so I can glue in the soundboard and the back of the box. I'm using 2 ton epoxy with a 30 minute working time for the soundboard. There is between 500 and 1000 pounds of pressure on the soundboard once all the strings are tuned up tight, so 2 ton epoxy ought to do the trick.
First I put wood glue in the grooves for the box back and slide it in place. Then I pull out
the soundboard and spread the epoxy in those grooves before sliding it back into place. Last of all I prepare the remaining side of the box with a new batch of epoxy. After putting the side of the box on, I screw the wood screws in. All done!
After the epoxy has cured I cover the metal brace at the top, then add the foot pieces at the bottom of the pillar. The foot pieces are important to help the harp stand upright and to keep the base of the pillar from twisting. I added a decorative wood piece on the arch at the top of the box, just because I felt like it. Those other pieces of light-colored wood are not just for decoration. The long ones keep the pillar from bending under the tension of the strings.


Notice that the bottom of the string rib is braced by the inside edge of the pillar. This is to keep the strings from ripping the soundboard out of the base of the box.

I always put this inscription on the back of the soundboard of my harps.
I had already attached the top and bottom of the box to the arch and pillar using wood screws and wood glue. Next I needed to install the wood screws to hold the box together, two on each corner. Because I was working so close to the edges of the boards it was very important to countersink the screws so the boards would not crack.

This red metal brace is to keep the top of the arch from twisting due to the torque from the strings. I'll cover it with a stained wood piece to make it look nice once everything else is assembled.

Once the wood screws are all in place I take them out on one side so I can glue in the soundboard and the back of the box. I'm using 2 ton epoxy with a 30 minute working time for the soundboard. There is between 500 and 1000 pounds of pressure on the soundboard once all the strings are tuned up tight, so 2 ton epoxy ought to do the trick.
First I put wood glue in the grooves for the box back and slide it in place. Then I pull out


After the epoxy has cured I cover the metal brace at the top, then add the foot pieces at the bottom of the pillar. The foot pieces are important to help the harp stand upright and to keep the base of the pillar from twisting. I added a decorative wood piece on the arch at the top of the box, just because I felt like it. Those other pieces of light-colored wood are not just for decoration. The long ones keep the pillar from bending under the tension of the strings.


Notice that the bottom of the string rib is braced by the inside edge of the pillar. This is to keep the strings from ripping the soundboard out of the base of the box.
Labels:
harp
Friday, May 23, 2008
Fitting the Soundboard

After staining the sides of the box and the pillar and arch I was ready to fit the soundboard. I cut it a little large so that I could sand it to a perfect match. Once the sides of the box fit snug with the soundboard in place, I disassembled the harp again so that I could put the string rib on.
Many harps these days don't have a top string rib. The top string rib is to protect the soundboard from the strings. Metal grommets can serve the same purpose. The bottom string rib is more important, giving a strong anchor for the strings. For me, the grommets are too much extra work, and I like the look of a top string rib much better.

I thought those old encyclopedias would be good for something someday. Once the glue is dry, I can drill the holes for the strings. Then it will be time to assemble the harp!
Labels:
harp
Subscribe to:
Posts (Atom)